You’ve heard it a million times: “hardware is hard.” But you’re passionate about an idea you have, and you’re willing to work hard to make it work. The key to making a new hardware product possible is to make it easier.
Making it easier means taking every opportunity you can find to make it less hard. While this may seem obvious, it is surprisingly easy to get bogged down in unnecessary details during the product design process. Below are a few tips and reminders to help you get your product through the prototyping phase and into the market faster and more efficiently.
This is by no means a comprehensive guide to creating a hardware prototype. Also, please note that this writeup focuses on smart home device prototyping. It does not address intellectual property protection, funding, or determining that there is a market ready to buy your product. Conducting a crowdfunding campaign can help you achieve some of these things, but that’s a different topic.
How to Create a Smart Device Prototype
1. Form-Factor Design—Strive for quick and dirty
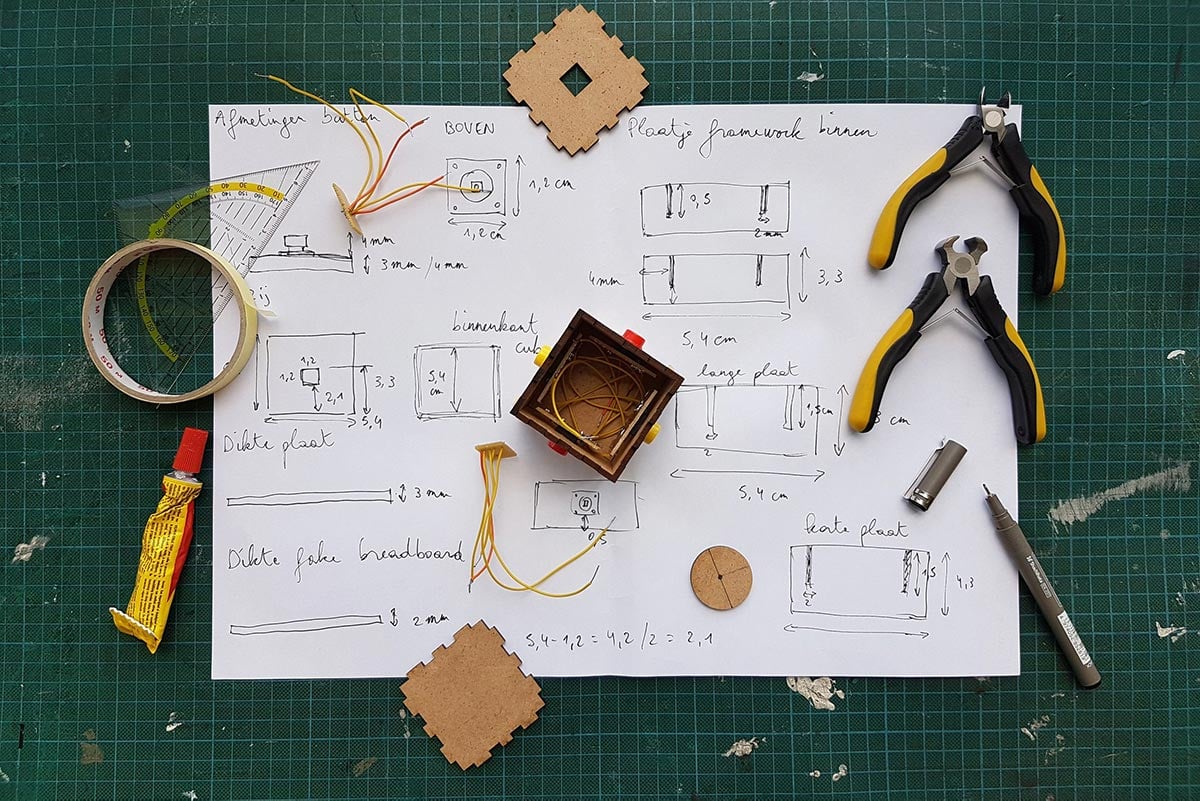
The first thing you need to do is create a quick and dirty prototype. Do not strive for perfection. Start by cutting up a cardboard box and taping it into the shape of your product. Congratulations, you’ve just created v1. You will learn more than you expect by putting together a few pieces and then iterating on it. This process will teach you about your form factor and the components of your design. It will also bring your attention to ways you can improve efficiency and cut costs.
Be careful not to infringe on any intellectual property in the long run, but give yourself a head start by not reinventing the wheel. Someone has already been through all of the considerations to create a working vase, so use their progress, save time, and save money.

2. Leverage existing resources to create your first prototype
Wherever you are, there are likely resources which can help you cheaply put together your first prototype. Look into local maker spaces, meetups, and cheap classes. Many libraries have prototyping tools such as 3D printers, laser cutters, and more, available for public use. Don’t let these amazing resources go to waste.
If you’re a student, you’ve got yet another advantage. Most universities offer some sort of lab or hardware shop, and it’s probably included with the fees you’re already paying. Even better, these spaces typically have experts available to help you as well. Whether you need help with tooling, circuitry, or picking the right materials, they can either help or find you someone else who can. Again, take advantage of these resources.
It should only take a few days to cycle through a few versions of your first prototype. It may not have a circuit board or a battery yet, but it looks like the product you’ve been imagining. This is a great start.

3. The Electronic Design
So you’ve created an object shaped like your product, but it doesn’t do anything yet. Soon, you’ll need to start making your device smart. Depending on the device, you may need anything from a simple circuit to a complex printed circuit board. Generally, an IoT device will at least include a microcontroller and some method of communicating wirelessly. Don’t worry about making your first iteration of the electronics fit into your v1 prototype. Instead, get started on a friendly development board, such as a Raspberry Pi, Arduino, or Particle board. For some tips on developing with a Raspberry Pi device, check out this previous blog post by Hassan at Yonomi.
4. Keep It Simple
At this phase, you’ve designed one of two prototypes you’ll ultimately complete: a form-factor prototype and an electronics prototype. You have a form-factor concept, now it’s time for the electronics. Don’t worry about putting these together yet, rather focus on making the electronics work. Chances are you’re not a circuits expert, so use your resources. Get advice from the experts in the maker space, family, friends, co-workers, or even YouTube videos. Your first iteration can be done on a breadboard with a cheap breadboarding kit. This is another tool that you can find in maker spaces and possibly public libraries. The point of this stage is to get the simplest possible version of your circuitry running. You don’t need a smartphone app or a website, just a proof of concept.
5. Make It More Efficient
Once you’re happy with your electronics design, you’ll need to make it more efficient. This can happen in a few ways. The first is space efficiency. You don’t want your circuitry to take up a ton of space, so convert it to a printed circuit board (PCB) if possible. There are enough considerations for PCBs to constitute another blog post, but the benefits include affordable production, a small form factor, and a low failure rate. Some maker spaces have CNC machines that will allow you to prototype your own PCBs. This is an invaluable asset that can help you identify flaws in your design before ordering a whole set. However, it’s becoming easier and cheaper to order small numbers of custom PCBs. Seeed Studio is one of many companies which will print and assemble small numbers of PCBs for you. Lastly, don’t forget to power and ground your components. This may seem obvious, but a surprising number of founders miss this critical step the first time around resulting in setbacks.
6. Team Considerations
If you’re designing an electronic hardware product, think about adding an electrical engineer on your team as they will ensure the product is power efficient. Chances are, at this stage, you’re still working with a small founding team. Consider making an electrical engineer a co-founder, or at least offering them equity in your company as a very early hire. This can help replace a salary if you haven’t secured funding for your company yet, and has the added benefit of ensuring that whoever you bring on has confidence in your product vision.
7. Putting the Pieces Together
Eventually, you’ll need to put the physical prototype and the electronics together. Unless you’re already an expert in design for manufacturability, this is a stage where you’ll need some more help. The goal here is to put your form factor and electronics prototypes together into one unit. Again, use every available resource and don’t go it alone.
Many universities have design for manufacturability programs. Typically, these are undergraduate mechanical engineering classes, led by a professor who is an expert in these skills. You usually don’t need to be associated with the university, other than operating in the surrounding community. One good example is the University of Colorado at Boulder’s Design 4 Community program. If your project is approved, a team of students will be assigned to your project. You will meet and consult with them, they will iterate on your design, and the professor will approve and sign off on their work. This is a win-win: the students gain experience in their discipline, and you receive an improved version of your prototype. These programs may also be able to direct you to resources for improving your electronics prototype.
Most commonly, these university programs are available for low or no cost to you. You will need to cover the cost of prototyping materials and be available to meet and answer questions. You may be asked to change some aspects of your product’s design. Be open to suggestions and let the team use their knowledge, but also make sure your design sticks to the product and market requirements that you’ve already determined. Depending on the program, the team may be able to help you with UL certification and other approvals needed to sell your product. At the end of this process, you should have a more polished prototype, and most likely some CAD files which describe your product.
8. Testing and Manufacturing
Your product should go through many rounds of testing before being released into the world. Once your prototype has been through a few iterations, and you think it’s working properly, it’s time for your first manufacturing run. This will likely need to be a low-volume run of test units. There are manufacturing shops that will perform small-scale manufacturing runs, including injection molding, routing, PCB printing, electronics assembly, and even packaging and direct shipping. You’ll pay a much higher price per unit, but it’s worth the tradeoff so that you don’t get stuck with 5,000 broken units. One shop for these small orders is ProtoLabs.
Utilize these shops to get a small number of units into test homes. If you’ve been doing customer development (which you should be), you likely have a list of test users lined up to be the first to test your product. Typically, these users will be some of your most enthusiastic and forgiving early adopters. They will happily install an imperfect product in their homes and provide plenty of feedback. They could even become evangelists for your product into the future. This is a great opportunity to build a community around your product and receive valuable testing and feedback.
Be realistic with yourself. Proceed if you’re confident in the current status of your design. Run a second (or third, or fourth) test program, if necessary. Circle back to your test users for more feedback. If you’ve fixed all of the issues revealed during testing, and you’ve determined that your product will sell enough units, and you have the cash available, it’s time for your first production run. In order to reach your desired cost per unit from a manufacturer, you will likely need to order a minimum of around 5,000 units. Good luck!
